
Discover the ancient irrigation technique of using an olla. This time-tested method can help you conserve water and improve your garden’s efficiency. In this article, we will show you how to make an olla and explain its benefits.
What is an Olla?
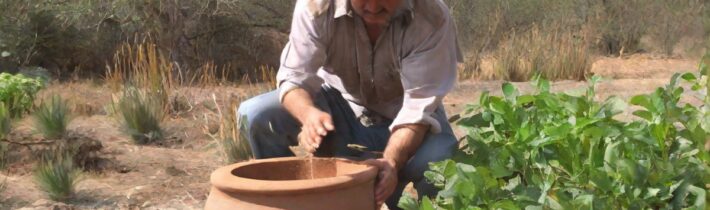
An olla is a porous clay pot used for irrigation. Burying an olla in the ground allows water to seep slowly into the soil, providing consistent moisture directly to plant roots. This technique reduces water waste and promotes healthier plant growth.
Benefits of Using an Olla
- Water Conservation: Ollas reduce water evaporation and runoff, making them an efficient way to water your garden.
- Healthier Plants: Consistent moisture levels encourage deeper root growth and more resilient plants.
- Time-Saving: Once set up, ollas require less frequent watering, freeing up your time for other gardening tasks.
- Eco-Friendly: Using an olla minimizes water usage and supports sustainable gardening practices.
Materials Needed to Make an Olla
- Terracotta pots (two pots of the same size)
- Waterproof sealant
- Sandpaper
- Clay saucer (optional)
Step-by-Step Guide to Making an Olla
Step 1: Prepare the Pots
Clean the terracotta pots to remove any dust or debris. Use sandpaper to smooth out any rough edges, especially around the rims.
Step 2: Seal the Bottom Pot
Apply waterproof sealant to the drainage hole of one pot to prevent water from escaping. Allow the sealant to dry completely.
Step 3: Join the Pots
Place the sealed pot upside down and position the other pot on top, aligning their rims. Use the waterproof sealant to join the two pots together, creating a sealed chamber. Ensure there are no gaps where water could leak out.
Step 4: Optional Saucer
If desired, place a clay saucer on top of the olla to prevent debris from entering and to reduce evaporation.
How to Use an Olla in Your Garden
Bury the olla in your garden bed, leaving the top of the olla exposed above the soil surface. Fill the olla with water and cover the top with a saucer or lid to prevent evaporation. The olla will slowly release water to the surrounding soil, keeping your plants hydrated.
FAQ
1. How often should I refill the olla?
Refill the olla as needed, typically every 3-5 days, depending on your climate and soil type.
2. Can I use ollas in container gardening?
Yes, ollas can be used in large containers or raised beds to provide consistent moisture to your plants.
3. What types of plants benefit most from using an olla?
Most garden plants, including vegetables, herbs, and flowers, benefit from the consistent moisture provided by an olla.
4. How deep should I bury the olla?
Bury the olla so that the top remains 1-2 inches above the soil surface. This ensures easy access for refilling and minimizes evaporation.
5. Can I use an olla in sandy or clay soil?
Ollas work well in various soil types, including sandy and clay soils. The key is to ensure proper placement and consistent refilling.
Related posts:
 Gardening and Nurturing: Finding Solace After Losing Motherhood
 Winter Gardening Tips: Keep Your Green Thumb Thriving Year-Round
 Essential Gardening Tools for a Thriving Garden
 A Beginner’s Guide To Rooting Plants In Soil
 How to Turn Your Pickup Truck Into a Garden
 The Best Full-Sun Plants for a Thriving Garden
 The Best Potting Soil for Houseplants, According to Plant Parents
 When To Repot Plants: A Room-By-Room Guide